The Basics of Minor ii V Soloing
When learning Minor ii V Soloing for guitar, a big mistake many guitarists make is to approach bebop improvisation from the basis of scalic playing.
The early jazz language developed on marching instruments such as trumpets, trombones and clarinets. These instruments are extremely adept at playing fast musical lines based around arpeggios, so to develop proper understanding and aural awareness of the genre bebop should be always approached from the perspective of arpeggios, not scales.
Later, we will use scales to ‘fill in the gaps’ but it is essential for now that our musical concepts and vocabulary are built from a solid foundation of arpeggios.
It is fair to say that many bebop solos are formed from appropriate arpeggios with the gaps filled in with scale tones and chromatic approach notes.
Unfortunately for us as guitarists, arpeggios are trickier to play than scales on our instrument. This is one of the challenges we must overcome on our way to learning the jazz language. The shapes will become comfortable more quickly than you think, so I would encourage you to go slowly and persevere with any arpeggio fingerings that you might initially find awkward.
What is an Arpeggio?
An arpeggio is the notes of a chord played sequentially instead of simultaneously. You are probably familiar with the concept of naming chord tones in terms of root, 3rd, 5th and 7th. They are named like this because of the way we form chords by ‘skipping’ notes from a parent scale.
We will begin by learning the appropriate arpeggios that fit over each successive chord in the minor ii V i progression.
Over the E minor7b5 (Em7b5) chord, we play an Em7b5 arpeggio. (Formula 1 b3 b5 b7)
Over the A7 chord, we play an A7 Arpeggio. (Formula 1 3 5 b7)
Over the Dm7 chord, we play a Dm7 arpeggio. (Formula 1 b3 5 b7)
In notation, these arpeggios can be played in the following way:
Minor ii V Soloing Example 2a, Em7b5 Arpeggio:
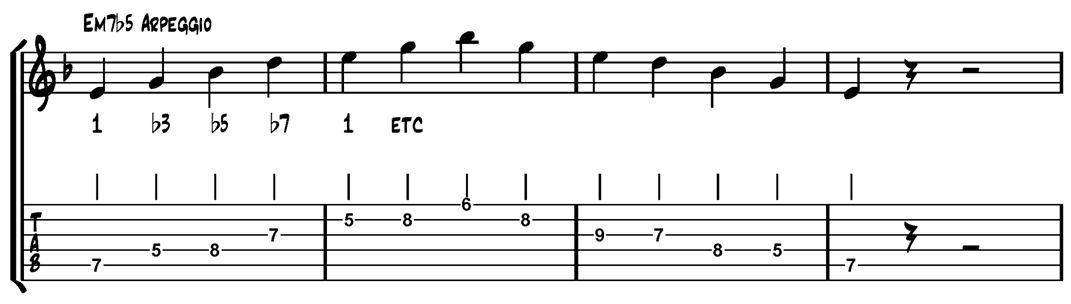
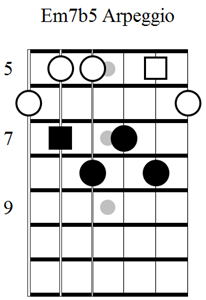
Notice that the solid dark solid dots in the arpeggio shape form the Em7b5 chord that you learned in the previous chapter. The notation in the tablature above begins on the square root note, E. For now you do not need to play the two lowest pitched notes in the neck diagram.
Minor ii V Soloing Example 2b, A7 Arpeggio:
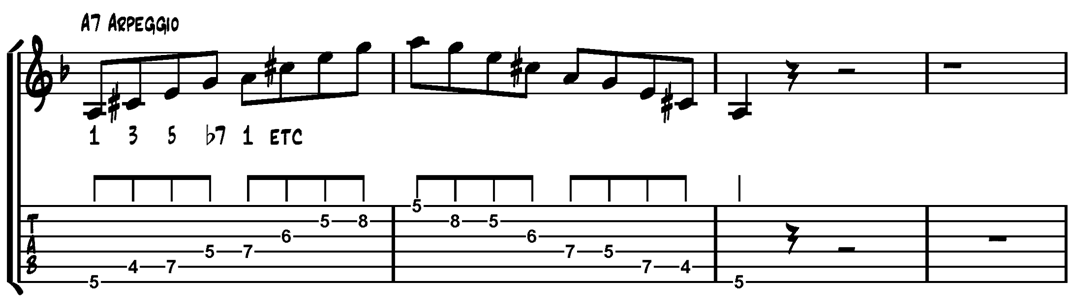
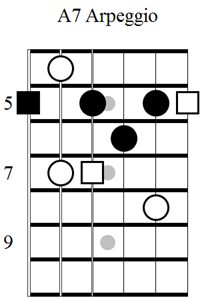
Again, here the solid dots are from the A7 chord you learned previously
Minor ii V Soloing Example 2c, Dm7 Arpeggio:
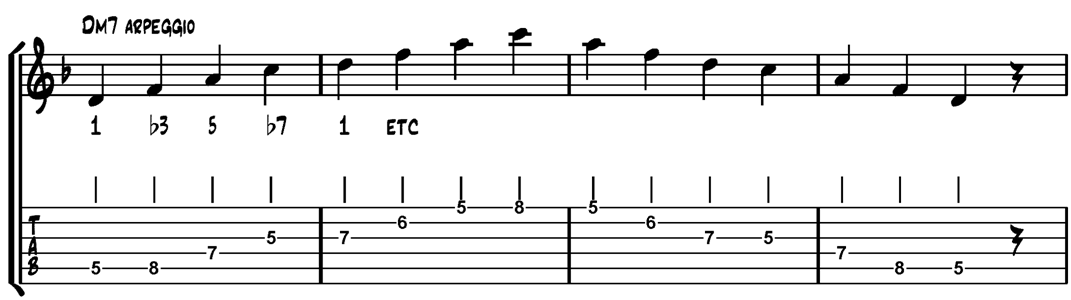
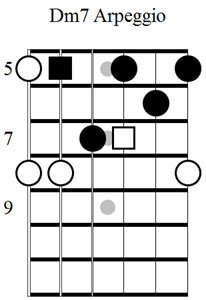
Once again, you will see that the solid dots are the chord shape you have already learned, and the arpeggio notes are built around that shape. Begin on the square root note and ignore the notes on the bass string for now.
Let’s start by getting familiar with the chord to arpeggio relationships in minor ii V soloing. Play the chord as shown by the solid dots and then play the related arpeggio. Do this with all three chords.
Remember, arpeggios are just the notes of the chord played consecutively.
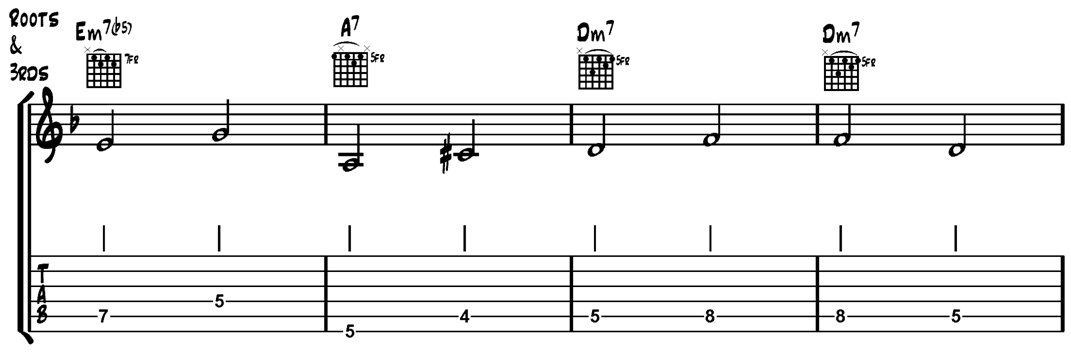
When you are close to having all three arpeggios memorised around each chord, try the following exercise with backing track 1. We are going to play just the root of each chord/arpeggio while the backing track is playing.
Minor ii V Soloing Exercise 2d:
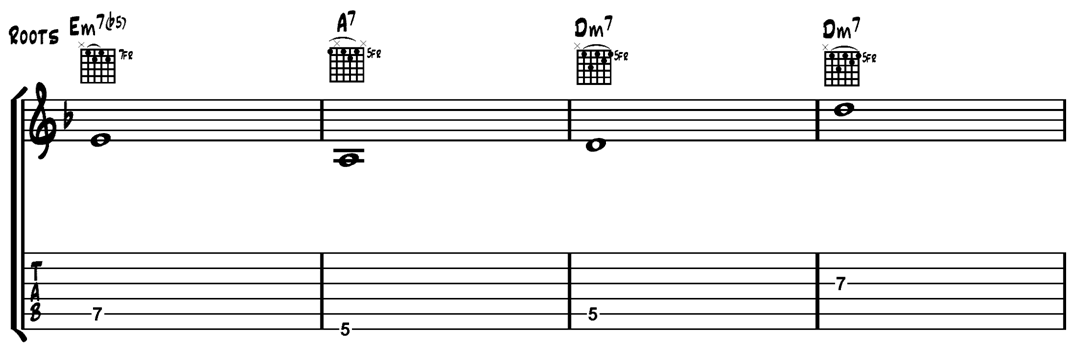
While this exercise may seem simplistic at first, knowing and hearing where your root is, is absolutely essential when it comes to confident soloing. Notice that for the second bar of Dm7 I have played the higher octave of the D root. Try this idea with each bar in the following manner:
Minor ii V Soloing Exercise 2e:
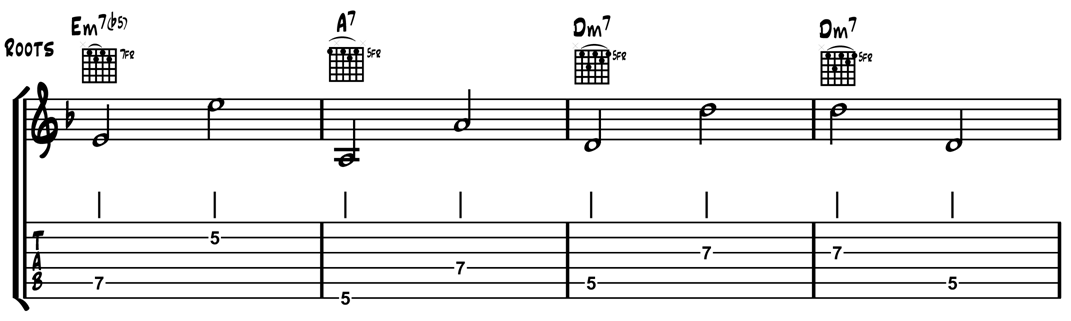
Play this again this with the notes in each bar reversed so you are playing the higher octave root first. In this position, there are root notes over three octaves in the A7 arpeggio. Can you find them?
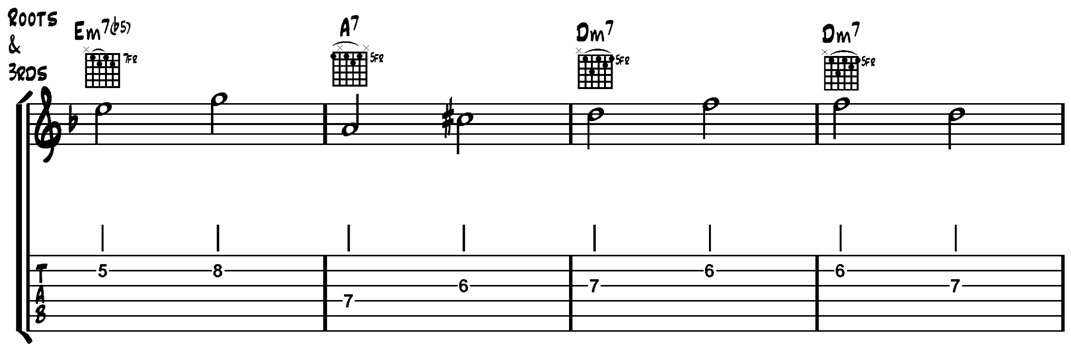
Moving on, we will now repeat the exercise but add in the 3rd of each arpeggio to our Minor ii V Soloing approach.
Minor ii V Soloing Exercise 2f:
Again, reverse the note sequences in each bar so that you play the 3rd first, and then the root. Next, play the same intervals in the higher octave.
Minor ii V Soloing Exercise 2g:

Remember to reverse the notes here as well so you play the higher octave 3rd and then the root.
Exercises like these are extremely important in teaching you how to begin your Minor ii V Soloing lines from notes other than the root, they increase your vision and aural awareness on the guitar.
Next we add in the 5th to the root and 3rd:
Minor ii V Soloing Exercise 2h:
Once again, practice reversing the order of the notes in each bar so you play the intervals 5th, 3rd, root, and then repeat both exercises in the higher octave.
Finally, we will play all four notes of each arpeggio, the root, 3rd, 5th and 7th.
Minor ii V Soloing Exercise 2i:
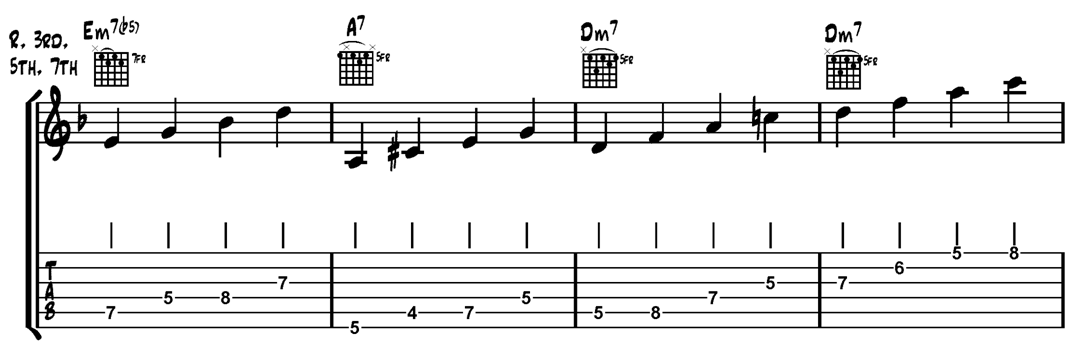
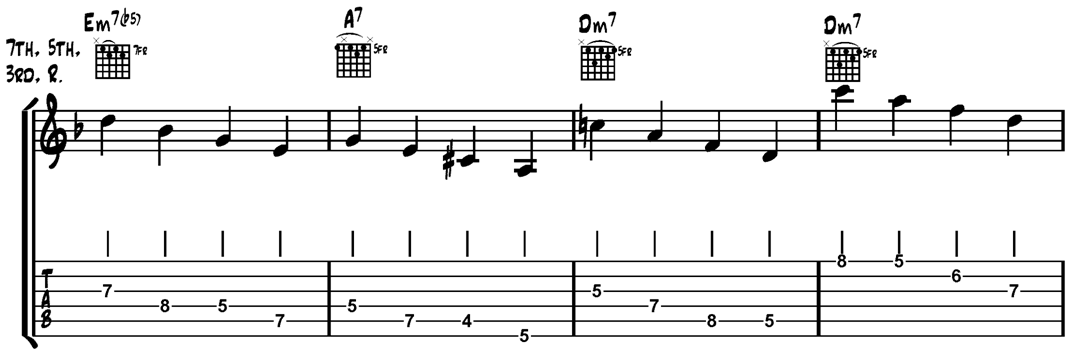
Play these patterns in the higher octave too and if you run out of notes, just double back on yourself. Remember to practice each bar descending from the 7th of each chord:
Minor ii V Soloing Exercise 2j:
The ability to play the appropriate arpeggio over each chord is a huge step on the way to mastering any bebop progression. Not only are your guitar skills improving, your ears are improving too.
Look at this stage as learning where the strong notes of the progression lie. If you can always hear them and find them on your guitar you will always be able to resolve any line that you are playing if you trust your ears.
Practice these ideas with all three minor ii V i in D backings tracks; slow, medium and fast to increase your competence and technical ability. As your confidence grows, switch back to the slowest backing track and master the following challenges:
Just play the 3rd of each chord. (Master this in the lower octave, then in a higher octave, then both)
Just play the 7th of each chord.
Just play the 5th of each chord.
Play the 3rd and then the 7th (first in low octave then in high octave finally play both notes together as a chord).
Play the 7th and then the 3rd.
Play the arpeggio tones in the order 3, 5, 7, 1.
Play the arpeggio tones in the order 5, 7, 1, 3.
Play the arpeggio tones in the order 7, 1, 3, 5.
Play the arpeggio tones in the order 7, 5, 3, 1.
Play the arpeggio tones in the order 3, 1, 7, 5.
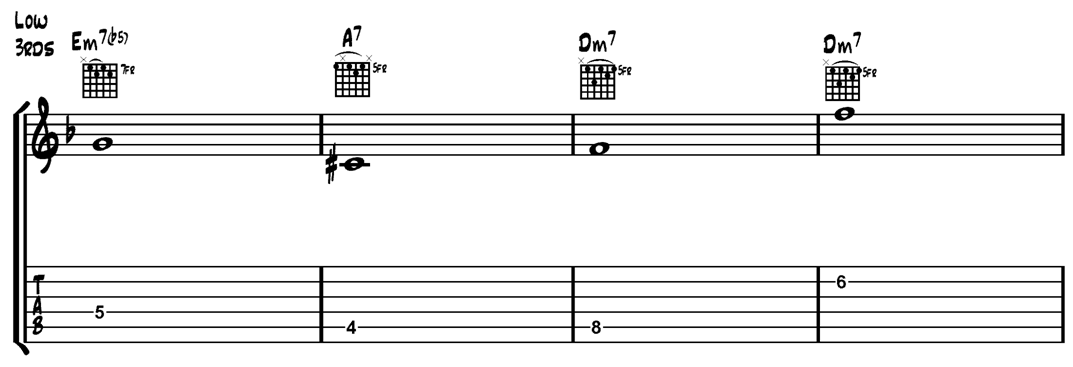
Don’t move on to the next chapter until you are very comfortable with at least the first five exercises in the above list. The following example is the answer to challenge one in the lower octave, but I have deliberately not given you the answers to the rest. This is to help you independently improve your vision, aural skills and fretboard awareness.
Although this may seem difficult at first, stay with it and treat the challenges as ‘tough love’. Some time spent here with pay exponential dividends for the rest of your jazz guitar playing life.
Minor ii V Soloing Exercise 2k:
To minor ii V solo like Wes, check out my best-selling book: Minor ii V Mastery: